> For the complete documentation index, see [llms.txt](https://unirep.gitbook.io/unirep/llms.txt). Markdown versions of documentation pages are available by appending `.md` to page URLs; this page is available as [Markdown](https://unirep.gitbook.io/unirep/introduction.md).
# Introduction
## How does the Unirep protocol work?
There are two different actors in the Unirep protocol: [users and attesters](broken://pages/OVKIxqgl2fYiXCXkN1wp)
* **Users** can receive and spend [**reputation**](/unirep/protocol/glossary/reputation.md), prove their reputation, and use temporary identities called [**epoch keys**](/unirep/protocol/glossary/epoch-key.md) to interact with other people. Users can generate a set of new epoch keys every [**epoch**](/unirep/protocol/glossary/epoch.md) (in this case, 7 days). In a way, the user gets a completely new identities every epoch which preserves their privacy.
* **Attesters** represent users to give reputation to an epoch key. Attester IDs are public and unchangeable so users can always prove that the reputation is from the attester.
### 1. Registration
***Users and attesters use different ways to sign up in Unirep***
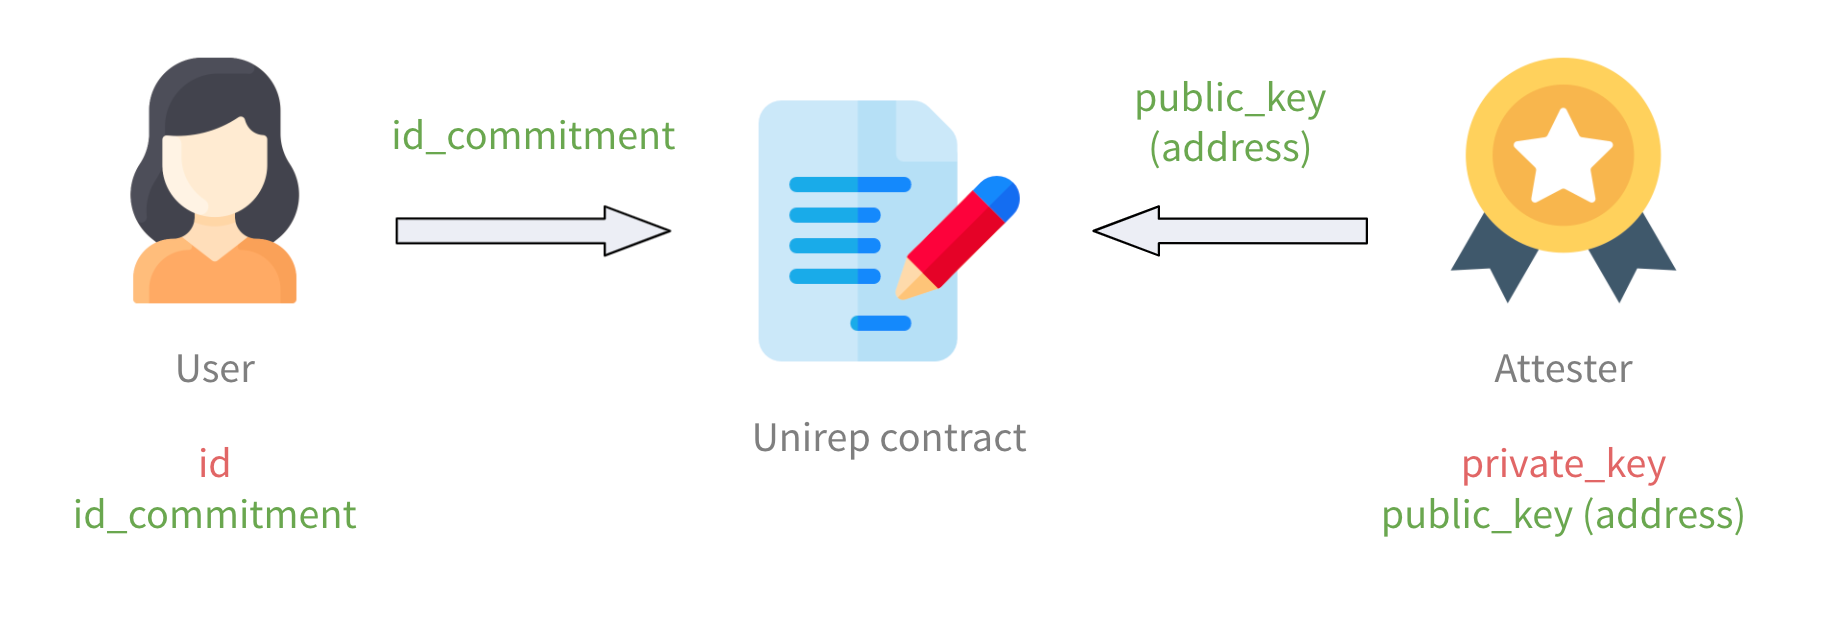
* **User**
A user generates identity and identity commitment through [Semaphore](https://github.com/semaphore-protocol).
The user holds the *identity* like a private key, and the *identity commitment* is like a public key that is submitted to the Unirep contract.
* **Attester**
The attester uses his own **wallet** or the address of a **smart contract** to register. After calling the attester sign up function, the Unirep contract will assign an *attester ID* to this address.
Whenever the attester gives an attestation, the Unirep contract will check whether the address is registered. If it is registered, the attester is allowed to give reputation to an epoch key.
> **Note:** Everyone can sign up as an attester with their wallet address and will receive a new attester ID
### 2. Give Reputation
***Only epoch keys can receive reputation.***
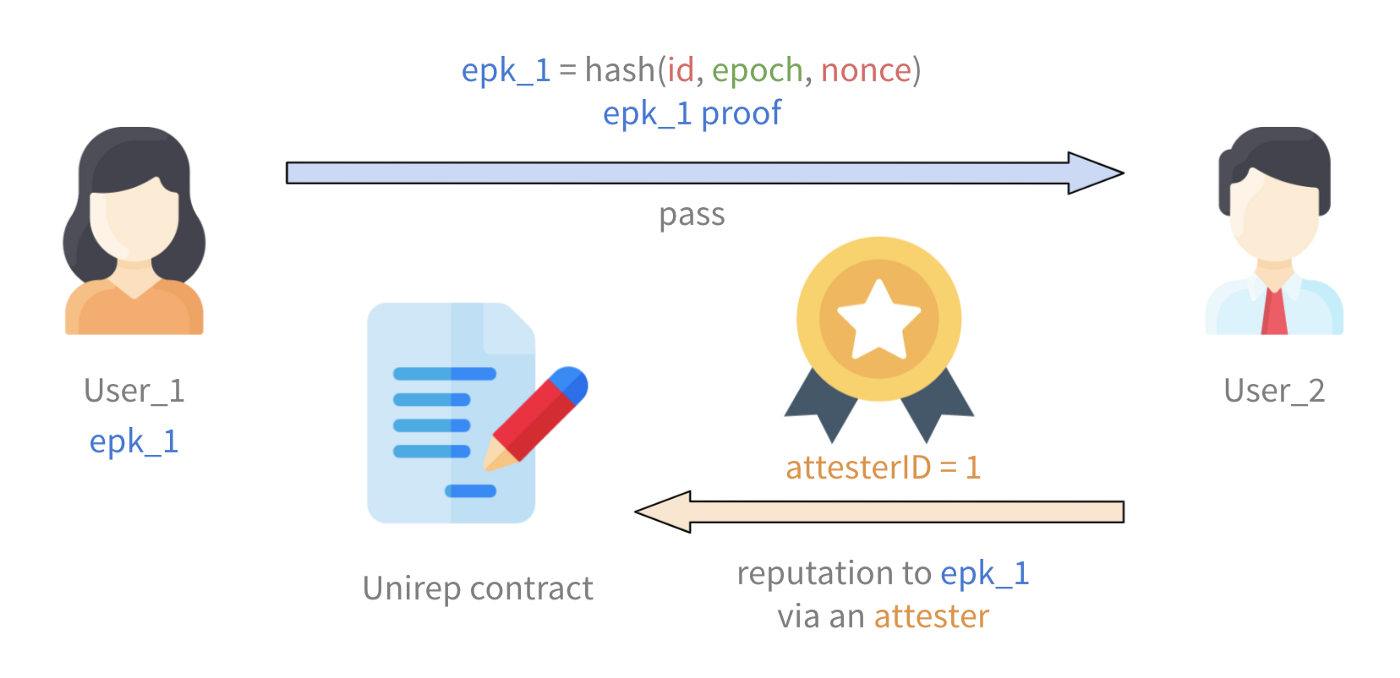
After a user signs up to Unirep, he can generate epoch keys to receive reputation. These epoch keys change every epoch, are unique to every user and look completely random. Therefore, to convince others that the epoch key is computed correctly with the current epoch and a valid nonce, an [**epoch key proof**](/unirep/protocol/circuits/epoch-key-proof.md) is used. Also, to convince others the epoch key is generated by a signed up user, the [**Global State Tree (GST)**](/unirep/protocol/glossary/trees.md#global-state-tree) is proposed. If the output global state tree root matches one of the history roots in given epoch, others can be sure that the epoch key owner is a valid user in the given epoch.
After seeing the valid **epoch key** and **epoch key proof**, the attester (or a user can submit an attestation through an attester) can give reputation to the epoch key through the Unirep smart contract.
### 3. Receive Reputation
A user can prove which epoch key he owns and everyone can easily query how much reputation the epoch key has from the contract. A user that has received some bad reputation during a certain epoch could *decide not to show those epoch keys* to other users. Therefore, after an epoch ends and all epoch keys are sealed, Unirep restricts users to generate a [**User State Transition**](/unirep/protocol/glossary/user-state-transition.md) proof that is used to update their reputation status.
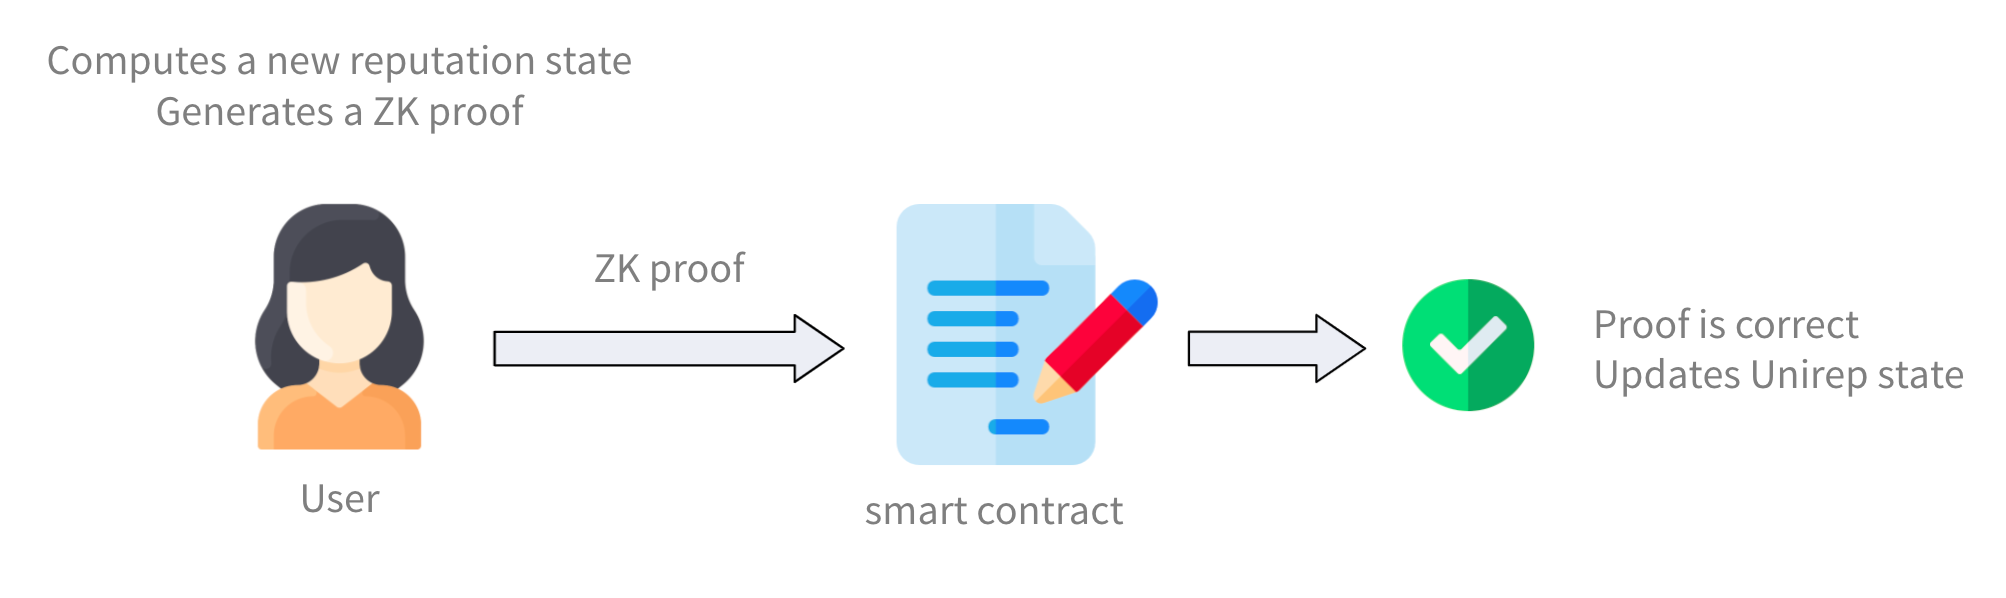
The [**User State Transition Proof**](/unirep/protocol/circuits/user-state-transition-proof.md) is used to ensure that the user calculates the latest user state (represents by a [**User State Tree (UST)**](/unirep/protocol/glossary/trees.md#user-state-tree)) in the correct way, and the user does not miss any attestation.
### 4. Prove Reputation
After a user performs a User State Transition, he will have the latest user state. At this time, the user can prove everyone on the platform how many reputation points he has in Unirep through a [**reputation proof**](/unirep/protocol/circuits/reputation-proof.md). The reputation proof checks
1. whether the user exists, has the claimed reputation (for example, it sums up positive and negative reputation from a specified attester ID)
2. The user performs User State Transition in the given epoch.
### 5. Advanced
To see more functions in Unirep, please refer to the following links
* [Spend reputation](/unirep/package/cli/spend-reputation.md)
* [Airdrop reputation](/unirep/package/cli/airdrop-reputation.md)
---
# Agent Instructions
This documentation is published with GitBook. GitBook is the documentation platform designed so that both humans and AI agents can read, navigate, and reason over technical content effectively. Learn more at gitbook.com.
## Querying This Documentation
If you need additional information that is not directly available in this page, you can query the documentation dynamically by asking a question.
Perform an HTTP GET request on the current page URL with the `ask` query parameter:
```
GET https://unirep.gitbook.io/unirep/introduction.md?ask=
```
The question should be specific, self-contained, and written in natural language.
The response will contain a direct answer to the question and relevant excerpts and sources from the documentation.
Use this mechanism when the answer is not explicitly present in the current page, you need clarification or additional context, or you want to retrieve related documentation sections.